i apologize

I apologize to you all...but wanted a three column blog and finally found a very helpful person somewhere in the world that helped me out! amazing how one in a million will help you for free just because you asked and the other 900 000 just couldn't be bothered with you! Anyhow many thanks!
Please be patient as I edit and change and bring back the stuff that have been lost while saving the new template and while editing the HTML file! I am now officially a computer lingo geekess I guess. thanks for hanging in there!
Ok...so my hair is done, my bags are packed, I am making a little gift, the outfit is all ready and I wish it was morning already! C you girls in the morning bright and early....geesh we have to leave home at around 5:30 AM with the winter morning chill in full swing! I will be brave!

art for B

how does one say thank you to friends and family when they are there for you in times when you really need them...well the only way i know how is to make stuff. this little piece sits on top of the glass of a gorgeous golden frame. the pattern paper is behind the glass while the actual image sits on top. the backing is stunning Moda fabric topped with a piece of rusty mesh. the image is from a sticker sheet by Design Originals and then simply finished off with a few hand sewn pearls and a piece of a stamped image.
so in anticipation of going to T!m's class on Friday, i bet i am not the only one who is truly excited and can't wait. i met T!m in 2004 while spending time with Anne & Vince of Ranger Industries. he truly is a work of art in many ways and a stunning teacher that is so passionate about what he does without the bitchiness of womanhood. i am all packed - pathetic i know...anyhow hoping to post some awesome and inspiring photos of the event and projects here on Saturday! have a fabulous and crafty day!

Father & Son

Jonathan is almost 2 years old now. This layout is of him the first time we saw him after his birth. The photos are of my brother and his son. Precious in many ways and sad in others. I wish my dad was around to see his grandson. Again i used little bits of paper, strips left-over from previous projects and a couple of embellishments.

To use up odd rub-ons here's a quick way of dressing up bare chipboard letters. Adhere your raw plain chipboard letters to your layout and then add the rub-ons directly onto the letters running across the entire length. You can combine different rub-ons of left-over sheets -
the things that normally are not used and then find their way to file 13.

Themed chipboard elements matched the paper and theme of my layout perfectly. Raise them using foam to add extra dimension.

Fun buttons from KI Memories designed by Elsie Flannigan is the perfect way to add a border below the photos.

The train themed rub-ons around the edges complete the look.
Supplies: Cardstock Bazzill Basics. Patterned paper Chatterbox, MME. Chipboard, rub-ons, buttons KI Memories. Rub-ons Prima. Chipboard letters FabScraps. Other embroidery thread.

recycled inspiration for cards

I can't stand buying beautiful products and then throwing away the packaging. Have you really looked at some of the packaging lately? They are beautiful and useful and i love using it for various things. These cards were no exception. I used a single sheet of backing cardstock from a set of K&Company Rub-ons. The backing is a cream colour with subtle printed text and images on it and was perfect to stamp on. The first card I used one of my favourite stamps from Stampington (Butterfly) and stamped directly onto the cardstock backing with grey Stazon ink, and then adhered the image to the beautiful K&Company patterned paper background. The newspaper strip wording is also K&Co.

I used a favourite stamp from PSX (discontinued) and stamped onto a piece of the packaging as my focal point image. The strip on the left is the same but i used a script stamp and then added another packaging strip with a scalloped edge. The dark brown cardstock is Webster's pages and the yellow K&Co. Three diamantes adds a finishing touch.

Ahh..how beautiful is this lady! I love this stamp. The entire card background is made up of a piece of the packaging (note the script on the edges and the subtle images) and then also a small piece for the stamped image. The focal point is matted to bring in some colour and a single 7Gypsies rub-on and diamantes adds the final touch.

I used the last piece of the packaging for this card and just managed to stamp the image again. The background is made of K&Co and the cream patterned paper is Webster's pages off-cuts with a scallop of Bazzill Basics in dark brown. Can you tell i love diamantes? well they add that final touch of glamour and sophistication.

I love making cards with my strips of off-cuts and odds. You know the stuff that is always left-over on your desk after creating something else. Well here's to some easy and cheap cards made up of packaging and a few odds and ends. I hope you find some inspiration to look at your packaging material with new eyes and see the true possibilities they offer in your next creation.
Have a splendid and creative day! I'm off to make a layout that is all set out and ready to be assembled...just waiting for a final moment of brightness as to what to do on the background!

inchie boxes

ok..so if you are sick and tired of hearing about me sorting and throwing away and discovering new old things then i apologize- but that's in our nature as scrapbookers, mixed media artists and crafters...we hoard, we gather, we intend to make, we throw away and gather more and then we create. so while cleaning i found millions (ok a lot)of these little one inch boxes cut for wedding favours that was never made. so i started gathering all the packaging on my table, stamps, and odd buttons and beads and stuff and made some of these. added a few splashes of glitter and there you have it. i think they will make for cute xmas tree decorations with the right colours and theme, or even for easter and halloween and thanksgiving and birthdays or anything else we creative souls can dream up. i will have a few suspended somewhere. have a wonderful and blessed creative week.

ink-toxicated

i absolutely love my alcohol inks! such a pity that the suppliers in South Africa are having such problems supplying us with the necessary quantities we need to fulfill this need within us! Oh well - so to soak my sorrows I thought I would share this project with you. These are little memory glass frames available from most supermarket stores. They measure 4 x 6 inches. The hardboard is covered with glass and four metal clips keep everything together.
So here's what you will need:
Alcohol inks, glass frame, rubber stamp, black dye ink, white card stock.

step 1: Undo the clips from the frame and separate all the parts.

step 2: cut a piece of white card stock the same size as your frame. Stamp your image in black ink on the white card stock and set aside. Combine two or three images together to form a collage effect if you like.

step 3: turn your glass over so that the side that was facing the paper inner is now on top. This side is generally free from any greasy marks. Use your alcohol inks and create a coloured area on your glass. Do not mix too many colours or else it will turn to mud.

step 4: once you are happy with the result leave the glass to dry. Turn over the glass and make your sandwich with the hardboard, then your stamped image, and then the glass and clip them together. Remember at this point you should turn over the glass so that the alcohol ink is on the inside facing your stamped image.

tips and tricks
  • to create the blobs on the alcohol ink, drip small drops of blending solution on top of your ink and let it bleed to form interesting effects.
  • if you hate the look, clean off the alcohol ink with the blending solution and start again.
  • use a single colour or combine 2-3 colours together.
  • these make really cute little gifts to hang in your guest loo, a babies nursery or the kitchen.

supplies: Alcohol ink Ranger Industries. Stamp PSX (discontinued). Ink Archival Black. Ribbon in photo Hanna Silk. Other Memory frame.

**PS this morning, while still on a cleaning spree that has lasted about 2 weeks now I found some pretty dotty serviettes (i think they were intended for an ATC swap) i had some inspiration. So watch out for some frosty covered notebooks as a result of this cleaning spree.

learning + layout

so while I have been missing in action for a few days I have been studying HTML code. One is never too old to learn...yeah right...well my honest opinion would be that life is too short to learn code, but none the less here I am. At the ripe old age of....(in your dreams) I am learning and studying to better my abilities to communicate in the land of squiggly brackets, arrows, dots, spaces, breaks and what nots. I hope i get it some time soon.
In the meantime here's a layout I did long ago as well but a firm favourite. It includes ten ways of embossing and using embossing powder and wax on a single layout. Apart from stamping on the background paper and embossing I altered chipboard letters, created resisting on old book paper, poured UTEE directly onto my paper and then stamped into it and created memory slide embellishments with bee's wax.
***
Supplies: Paper, flowers, rub-ons Prima. Chipboard letters Enmarc. Other Crystal word, stamps, embossing powder, UTEE, barcode font downloaded from the web, diamantes.

coffee+winners+stuff


Yvonne Hellyar...please contact me with your postal address to send out your parcel. thanks!

**********************

I am relieved to say that I have cleared out about 6 boxes of paper work and junk! I purged about 4 large boxes and 4 boxes for donations! I am left with 40 boxes all sorted with only paper. This is a huge thing that I have accomplished and I feel so much better for doing it! The one good thing is that I found something dear to my heart that was missing for close onto 3 years! That's aweful I know! it is an unmounted stamp from PaperArtsy that a dear friend gave me! I had filed it just before we moved and only discovered it now after all this time. My theory is that there has been a lot of water under the bridge and some forgiveness has taken place on both ends and I had cleared all channels to find it again! I am greatful! Needless to say I love the image and used it on some swaps that I am working on! Friends are awesome. The image here is of a Smell the Coffee ATC swap we recently did and this is only a taste.

blog candy winners...

and the winners are....Debbie Harris (magazines) and Yvonne Hellyar (e-zines) as chosen by my random chooser #1...Jayson! My apologies for the delay. I will get your parcels out next week.
******************
So this is KC the easter bunny who has brought me nothing but absent-minded-ness and an urge to clear out my stash. KC was given to me by none other than my friend Kathi Chapman! Isn't he too cute! It has been a liberating 2 days so far and I am taking it slowly because this time it is for real. So far I have chucked away ...my past bosses and workers..YEAH-HAH!!! I have chucked out all projects, paper work and stash that has anything remotely to do with the past. It has been long overdue but I have finally buckled down and TRASHED everything. In some ways I think this stuff has always kept me caught in a place and time that is over and now I have finally let go! Then I have filled plenty of boxes with cards gone to my mom to use, boxes of paper for a lady who does work with mentally and physically challenged kids and adults, and some other things for the girls. All my boxes are now colour coded with a colour swatch on the front and all the boxes only has paper in it. Then there are a few boxes I managed to empty (gasp), and then a few more with props and ribbon to do. I figure about another day or two that I will be missing in action. Have a blessed Sunday!

easter basket cases

Quick Easter baskets that you can make for family and friends. You can hide them in the garden for the kids or use them of your Easter table as gifts and decorations. I used these little baskets for invitations I made a couple of years ago with a picnic theme. They are made of straw with a cute little wooden button. I replaced the closure with a ribbon that wraps around the button. I sprayed them white on the outside for a fresh clean look. The little card was made using free clip art downloaded from www.stampington.com. I printed the image onto cream cardstock, matted it onto pink Bazzill Basics and then added a gold glitter frame around the edge of the image. The Easter eggs are from Woolies. This was the one time I wished I actually bought a paper crimper. Now if you really knew me you would know that I think it is utterly kitch to use one of those tools, but for the first time in my crafting experiences I now see the use. But instead I made a plan... I simply used a piece of left-over patterned paper from K&Company and folded it into small pleats until the entire piece was one small strip. I then used my scissors and cut small pieces. When I pulled them apart slightly I had little ruffled pieces of paper to put inside the baskets. A quick way of doing things yourself even if you don't have the correct tools. 'n Boer maak 'n plan!
Here's wishing you a crafty week of getting ready for Easter celebrations! And in the case of my friend Natalie...go and buy some more Easter eggs because the box is empty!!

make your own photo corners


I am not a huge fan of punches...except for the odd ones like a corner rounder, circles and squares. Anything else that I can make myself is a plus. Like the fact that I can use my square punches to make photo corners out of any cardstock and paper to match my projects. Here's a quick how to.
Supplies: Cardstock Bazzill Basics. Punch McGill.

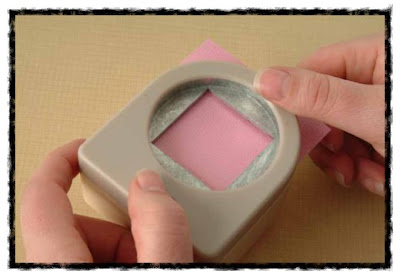
step 1: punch a square out of cardstock. Use any punch size that you desire. The larger your square the larger your corners will be.step 2: insert your punched square back into the same punch with a 1cm (1/2 inch) of the edge revealed on the outside, and punch a smaller square out of the one corner.

step 3: once you punch your smaller square you will be left with just an outside edge. Cut the ends at an angle to form your corner. You can make them as big or as small as you want to.

Decorate your corners to make them truly unique. Ink the edges to define your corners, stamp onto tthem to add a pattern, paint them, distress the edges, punch small circles in them and back with a plain coloured cardstock or leave them as is. The choice is yours.

cheese & chalk

Ok so a bit more chalk than cheese...Here's a layout I did a while ago using some decorating chalks and stamped images, and lots of photos. I really like doing layouts in this portrait style to add a bit of variety to my albums. Here's a quick how to for creating accents using stamps and decorating chalks. If you have never tried your hand at it, it is really easy and you can create stunning effects. The arrow stamp was used to add some movement to the layout and coloured using chalks.
step 1: ink your stamp using a clear ink pad. I use Versamark for this. Lightly pat the ink pad onto the stamp. This ensures you have control of the ink and get an even layer of ink onto the rubber.
step 2: stamp the image onto your chosen cardstock. I used Arches Aquarelle from my local art supply store. **my favourite paper with a deckle edge!
step 3: colour the stamped image using your pixie applicators and chalks. Lift the chosen chalk colour using the pixie applicator and in small circular movements apply the colour onto your paper. To clean up the image around the edges, you can use an eraser. Use an artist fixative to spray the chalked images to set the colour permanently and prevent it from smudging.
Decorating chalks can also be used to colour stickers and ribbon. I used a sheet of American Crafts white stickers and coloured them using the same yellow as for the stamped image. Spray them with a thin layer of fixative to seal in the colour before using them. This is a great way to alter stickers to match your theme and colour scheme of your projects.
The coloured stickers worked much better with my layout colours than what the stark white colour would have.
Bar coded fonts add a quirky and fun element to your projects. You can download free bar code fonts from http://www.dafont.com/ or search the web elsewhere for interesting fonts to use.
Inspired by Candice Greenway where I first saw her use real film strips on her layouts. Since most of us have taken the leap into the world of Digital SLR cameras, you may have some old film around the house that you can use. Or alternatively use those obsolete film negatives that have since be scanned and electronically indexed.
I used some of my all time favourite photos on this layout in black and white. The paper used are from Making Memories (text), Chatterbox (stripe & floral) & Crate (orange spot). Stickers American Crafts. Resin button KI Memories. Photo turns 7Gypsies. Other Photo corners, film strip and ribbon. Font Century Gothic.

blog candy

today is a good day for a give-away! To celebrate three weeks in blogland I am giving away a full set of imagine magazines issue 1-12 printed format, and a set of digital magazines issue 13-19. All you have to do is leave a comment on my blog about what makes a great blog for you and what keeps you coming back again and again! So I need some inside information to create an even better blog filled with positive inspiration. Look forward to hearing from you. I will randomly pick 2 winners on monday 6th April. Have a fabulous creative day. Jowilna

Popular Posts

Like us on Facebook

Flickr Images