DIY Painted ruler board for The Wholesaler.

I am such a sucker for making things for my home. I love creating different things and swapping things out every now and again to change the look. As part of my current French farm house look I created this ruler board to put up on the side of my cupboard to fill in an empty spot and to add some interest.
Using my Silhouette and scrapbooking products makes creating things for the home so easy and versatile. I no longer see my scrapbooking tools and products as just that – they open a whole new world of creativity in and around my home. Making my home as much a part of my memory keeping process, as my scrapbooks.
So hop on over to The Wholesalers blog for a full step by step on how I created this ruler board using my Crafting supplies and Silhouette. The possibilities are endless.
Thanks for stopping by!

Butterfly wings - new stamp set and art journal page.

Up on the blog today at Chiswick today I am sharing another one of their new stamp sets and loving this one just as much!
So hop on over and catch a glimpse of the new stamp set and step by step article!
Here's wishing you a creative week ahead - and thanks for stopping by!
A blog without visitors is just me talking to myself - so know that you are so very much appreciated!

#lifeisgood - NEW stamped floral card for Chiswick.

I am up on the Chiswick blog today with this stunner of a stamped card using their new stamp sets.
Hop on over to the blog and see how i did it and to view the entire stamp set.
Love the layered look of the stamped flowers...
Remember to visit your local craft store to get your new Chiswick stamps sets today!
Please let us know if you have any trouble getting hold of the products and we will assist you gladly.
Until later – happy stamping! Have a blessed day!
Products used
Clear Stamp – Daisies (ER-C10) rs3174
3 in 1 Block Set with Interchangable Handle rs3070
Craft Guillotine – 6.25″ pct809
Plastic Bone Folder cr1200
9pc Eyelet Tool Set cr1100
Embroidery Scissor 110mm cr0900

Cuppa tea stamped thank you card - Chiswick.

I am over on the Chiswick blog today with a beautiful card using their new Tea and Cake stamp set.
Head on over to see how I added colour to my stamped image and to view the entire set of stamps.
They are so much fun and versatile - perfect for tea party invitations, recipe books, favorite meal time layouts....if you can think it you can create it using this stamp set.
www.chiswick.co.za/blog

Stamped details with lady Pattern Paper.

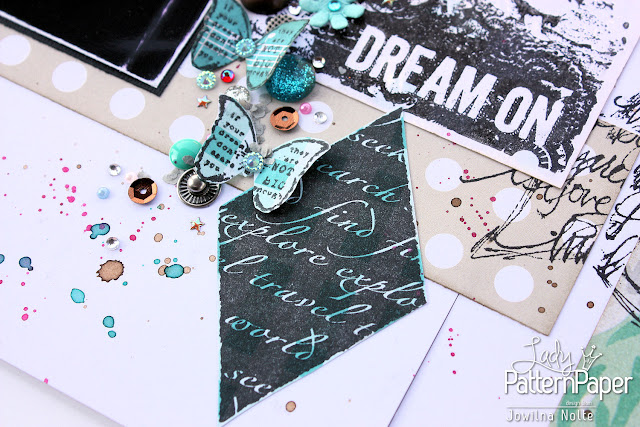
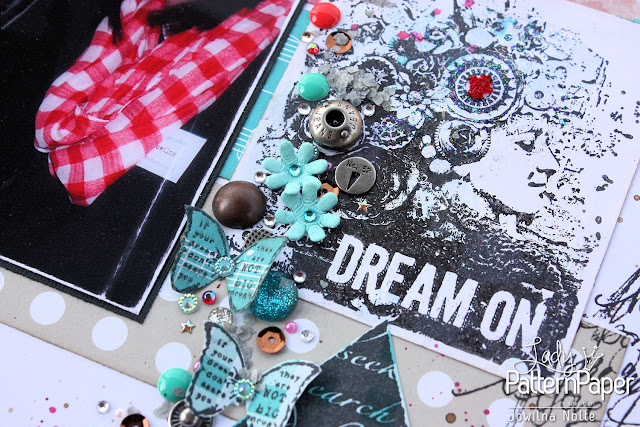
I have a huge selection of gorgeous stamps that I love so much. So I am on a mission to use all of them at least once this year – quite a commitment and mission but something that is making me feel so much better. But more exciting is the fact that I can create my own embellishments using my stamps. So I stamped a couple of images onto my Lady Pattern Paper and used them on my layout turning my layout into something truly unique.


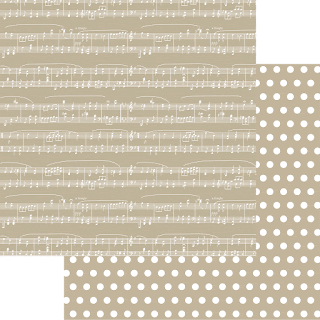
I used a combination of the Intense Teal and So Buff papers to create a very pleasant layout that is calm – a somewhat neutral background for my photos to sit on and the cluster of stamped elements and embellishments.

 I stamped this beautiful diamond shaped stamp onto the Essentials Gingham pattern. The stamp allows a slight hint of colour and pattern to show through it making for an interesting element.


 I only use VersaFine ink for most of my stamped images. This ink is perfect for the detailed stamps I used, and dries perfectly on the Lady Pattern Paper.
 For my butterfly stamped images I used a combination of Gingham and Sheet Music papers in Teal. The pure black ink against the stunning teal colour is such a wonderful combination. To finish off the stamped butterflies I added some metal elements and diamanté to the centres as a nice finishing touch adding dimension.
 Use large and small butterfly images and stamp them onto your patterned paper to create your own embellishments. Dress them up with other elements and let them float on your layout by only adhering them in the centre of the butterfly and letting the wings float lose.
To add some of my red/pink accent colour I used a scrap of the Pink Mary script paper to the right hand side of my layout, combined it with stamped words and elements for dimension and texture. Grouping elements together to fill an empty space on a layout makes for a wonderful and simple statement.

I love how busy this layout is, but also quite pleasing with loads of interest. And my favourite foundation for creating this stamped detail layout is my Lady Pattern Papers.


DIY Modern Art Using The Silhouette.

DIY
So when it comes to art in your home, are you a creative person decorate? Well for me it is quick and simple – minimalistic in some ways but always classic and timeless. The Silhouette offers me the necessary help when it comes to getting the job done! For this project I used my Silhouette CAMEO to cut some modern shapes out of smooth white cardstock and then added some colour with my much loved Tsukineko All-Purpose Inks. I love how this project turned out.


Head on over to The Wholesaler's blog for a step x step on how I created my piece of art - the perfect DIY project for this weekend!

Project Life with Lady Pattern Paper.

I simply love how the Lady Pattern Paper can work for anything! I have said it many times how versatile this paper range is. And to prove it, this week I took it upon myself to use it in a project life layout I have been struggling to finish for a really long time.I used the paper range to create some PL cards and a matching single page layout on the opposite side of the pocket page.
I include both my regular double page layouts and Project Life pages in the same album, so every now and again I end up creating a single page layout next to a pocket page.This makes the following pages easy to just do a regular double page layout.
I added some stenciling onto my single page layout and repeated it on my PL cards I made using the LPP. Repetition is a great way of letting the eye visually draw your attention across the entire layout. By placing two half circles in such a way that they form a single circle - I also create flow.
I also repeated the paper designs and colours on both sides of my layout for better flow. I also love how the colours pick up my inking done on the right hand side making it a really colourful and fun layout.
Step 1 - You will need Modelling paste or texture paste, black acrylic paint, small plastic tub, palette knife and a stencil of your choice. You can use any colour of paint to add to your paste to create a custom colour.
step 2 - Mix the paste and paint together to create a custom colour paste.
step 3 - Position the stencil on your PL sized card cut from LPP and apply the paste in a smooth and even fashion. Apply the paste over the entire stencil design as desired.
step 4 - Carefully lift the stencil from your paper and leave it to dry complete before using it.
Add embellishments and other decorative elements to match your theme.
And there you have some awesome custom made PL cards for your album. This is a great way to use up all those LPP pieces left over from your other layouts.
I even used my smaller scraps to create matching photo matts for my single page.Layer your photo onto 2 or 3 pieces of LPP for a dimensional and colourful photo matt.
Add some sewing details to the photo matts for added texture and interest.

I used these papers for my PL layout.
Happy Memory keeping.

New stamp sets from Chiswick – resist embossed card.

Have you seen the new stamp sets from Chiswick? Well if not you are in for a real treat as they as simply wonderful. My favorite I think for now is the heart set. It has a whole bunch of hearts on it – perfect for anything from the grungy teenager to the romantic soul.
For this resist card I used the scribble heart – and simply love the outcome.
Embossing and resist is still one of my favorite go-to techniques when it comes to stamps.
It is such a versatile and effective way of adding patterns and interest to a card.
step 1 – Stamp the heart image onto white cardstock using Versamark ink pad.
step 2 – Sprinkle the stamped image liberally with white pearl embossing powder.
Shake off the excess embossing powder and return it to the container.
step 3 – Use your Chiswick heat gun and heat the image until the embossing powder is fully melted.
The powder is melted when the image turns shiny all over.
TIP: Make sure the entire image is heated and the powder melted – let it cool down before inking the image.
step 4 – Add some dye ink onto your craft sheet. Mist the ink with water and then dip the embossed image into the ink. The ink will take to the cardstock and the embossed image will resist the ink.
Use a soft cloth to wipe any ink that may sit on top of the embossed surface.
 The white images against the inked background is such a beautiful effect.
 Products used:
Dye Ink Pad- Red
rs3291
Clear Stamp – Assorted Hearts (ER-C19) rs3176
3 in 1 Block Set with Interchangable Handle rs3070
Keep an eye out for more of the wonderful stamp sets in the coming blog posts.
Happy stamping!

DIY Party Lemonade Cups – Come On Summer!

DIY
In preparation for the summer months I am making some cute drinking cups for family get-togethers and a braai or two with friends – and these just happen to be perfect for a hot and balmy summer’s evening. Plastic cups can be so boring but with a little craftiness and a few gorgeous summery patterned papers you can create fun and fabulous pieces.
What I did… Purchased some plastic cups with lids from our local plastic shop and decorated them using Lady Pattern Paper. I also found some fun matching paper straws to support my summer theme.
***
Step 1 Punch various sized circles from your selected Lady Pattern Paper.


Step 2 - Punch a small hole in the circle for the top of your lids that the straws will go through.


Step 3 - Print some circles with a fun summer theme and punch layering circles out of Lady Pattern Paper and plain cardstock. 


Step 4 - Adhere the circles together in a layered fashion and then adhere them to the front of the plastic cups for a fun and festive look.


These festively decorated cups are perfect for kid’s parties, informal get-togethers and the family braai. Decorate them with different colours and themes.
The Lady Pattern Paper, Basic Essentials, Script, Pink Mary is perfect for these lemonade water cups – it truly makes me want to drink more water – the perfect healthy summer alternative. 


And these DIY party lemonade cups will make me the ever so fun summer hostess!

Make A Mark With Silhouette Stamp Material.

You guys know how much I love stamps and using them on my projects, and that I have a slight stamp addiction, so having said that, a girl can never have too many stamps and there is always that need for the next project! 
 So I was thrilled to finally try my hand at cutting my won stamps on the Silhouette – and it worked like a dream. The stamps are not bad at all – they will never last a lifetime like the proper manufactured stamps we buy made from red rubber or acrylic but they work beautifully. The only thing that sets them apart is that the stamp material is not that thick, although it is very strong. This is only a problem when you start inking the stamp, but even then, when done the right way is not really an issue at all.

step 1 - You will need some stamp material, your special stamp cutting matt and your Silhouette machine.
 step 2 - Remove the white protective sheet from the cutting matt. You will notice the cutting matt is full of small holes. This is so that the stamp material [rubber sheet] can breathe – when you adhere the stamp material to the cutting matt you need to press it down to remove all the air bubbles from the sheet and the holes in the cutting matt helps with this process. If there is any air bubbles while cutting the stamp material may scrunch up and cause a misformed shape being cut.

step 3 - Adhere the stamp material to the cutting matt and make sure you remove all the air bubbles
 step 4 - Set your cutting blade to the #9 setting for cutting the stamp material.
 step 5 - Change the rollers on the machine so that they will fit onto the stamp cutting matt. Then load the cutting matt into the machine.
 step 6 - Open your Silhouette software. Open the design page settings and select “stamp” mat from the cutting matt box.
 step 7 - Change the paper to fit onto the cutting mat – which is also the size of the full sheet of stamp material 7.5×6”. TIP: I chose to use the entire sheet of stamp material rather then cut it to size to just cut one stamp. I filled the entire sheet with a range of stamps and cut them all at once – the left-overs I will use in another way.
 step 8 - Pick the design you want to cut for your first stamp. I used this gorgeous flower silhouette, but knew that the detail may be too much for the thin stamp material, so I edited it a bit. TIP: remember when cutting stamps, you rather want a bold solid design than a thin detailed image.
 step 9 - Pick your eraser tool from the menu on the left.
 step 10 - Erase the parts that you do not want to cut from the original design. I then copied the image so that I would cut two stamps of the same flower.
 step 11 - I also added some more designs to my stamp material that I wanted to cut.
 step 12 - Send the file to the machine and cut. Remove the cutting matt from the machine and carefully peel off the stamp sheet. You will notice that some areas you need to full at the stamp a bit release the design – be careful but not overly careful. The stamp material is quite strong and will tear with just the right amount of pressure.
 step 13 - Remove the stamp and adhere them to an acrylic block. You are now ready to stamp your images.
 step 14 - Because your stamp material is brand new, you will notice that it seems that the ink does not take to the stamp, this will correct itself by adding ink and stamping for a couple of times before you get perfect image. Using the right type of ink for this is essential.
step 15 - Stamp the image and sprinkle with embossing powder. Heat set until the powder turns shiny with a heat gun.
 I recommend using Versafine ink pads for basic stamping, Versamark for embossing your images and Versamagic for colourful stamped images. I tried all of these inks and they work perfectly on the Silhouette Stamp Material.
 Products Used

Popular Posts

Like us on Facebook

Flickr Images