
Better photos
8:13:00 AMI by no means claim to take perfect or even good photos - for several reasons. 1. I have always wanted to become a photographer and have a real passion instilled by my late father but never got there. 2. I have only one lens for my current camera - a 2.8 100mm Macro lens. This in my humble opinion is one of the best lenses you can own for macro photography - but for taking photos of layouts cards etc...well ... The reason I have this lens is because I love the fact that you can zoom in on a specific part of your project for a close up and it blurs the rest of the image - that is my kind of photography. I however do not own a normal 50mm lens - but it is on the wish list along with the new Nikon D3X that prices around R95.000.00 currently - this little baby won best digital professional award for 2009 - need I say more...
But here are some tips for those (like my friend Cariena)for taking better and more pleasing photos - and lets face it we can all learn something everyday...and that includes me.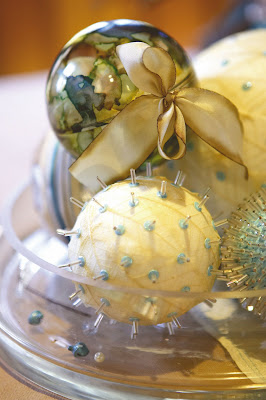 Photo: Christmas Baubles - polystyrene covered in skeleton leaves and beaded pins. Acrylic bauble coloured with Alcohol ink by Ranger Industries. My favourite ribbon - Hanna Silk from Japan all placed in a glass bowl and beads and bells scattered inside.
 Photo: Christmas Baubles - polystyrene covered in skeleton leaves and beaded pins. Acrylic bauble coloured with Alcohol ink by Ranger Industries. My favourite ribbon - Hanna Silk from Japan all placed in a glass bowl and beads and bells scattered inside.
How to take photos of your art
1.Take the picture using the highest settings and resolutions available on your camera. You can always reduce the image size but this way you are starting with the best possible photo.
1.Take the picture using the highest settings and resolutions available on your camera. You can always reduce the image size but this way you are starting with the best possible photo.
2.Don’t use a direct flash, or you will end up with ‘hotspots’ in your photo, where excessive light glares off your subject. If you don’t have lighting equipment, try to take the photo in bright, diffuse sunlight instead. If you absolutely must use the camera’s flash, put your finger over the center to tone down the glare.
3.For small artwork, lean over the picture and take the shot from above - get on a chair for this if need be. Otherwise you can mount it securely on a flat surface and use a tripod or other stand to hold your camera at the same height. Let the artwork fill as much of the camera lens as possible - this avoids any colour corrections taking the background into account.
4.Use a backdrop. This way you eliminate unnecessary background details from the photo. Black velvet is the best choice because it absorbs light, but a plain white background works too. Avoid patterns and awful colours that will clash with your art work.
5.To get the sharpest photos, use a remote or the timer feature on your camera to eliminate the natural shaking of your hands when you press the shutter button. It’s easier to correct colour and exposure than a photo that is out of focus.
6.Experiment with the settings on your camera. Take several shots of each piece with different exposure and shutter settings until you learn which ones work best for you. The only way to learn is to keep trying.
7.If your artwork is small enough and flat enough you can use a scanner to get a crisp, high-resolution image too.
8. Use a photo editing program to do a one-step photo correction that will fix the colour, lightness, hue, saturation etc and even remove the white fuzzy layer that digital cameras sometimes places over your images. You can also correct distortion and straighten your image.
OK that in short is some tips that have helped me over the years. And maybe by next year I can add photographer to my resume! Here's to wishing and dreaming and hoping - and one more thing to live for. Happy photography!


3 comments