Details with cutting dies on a layout!
7:40:00 AM
The more I use my collection of dies, the more I fall in love with them if that is even possible. I mean I really love the designs, but sometimes it is just an effort to pull out all the bits and pieces and actually use them – do you sometimes have that feeling? I know you do!
So in an effort to love my dies more and use them more, I have opted
to keep my Cuttlebug machine on my desk permanently and that have made
all the difference.
I started using my dies more and I love the simplicity they add to a
layout, project life pocket and card – making such a huge impact. And
the best part, you don’t need to do much to them to make them come into
their own right.
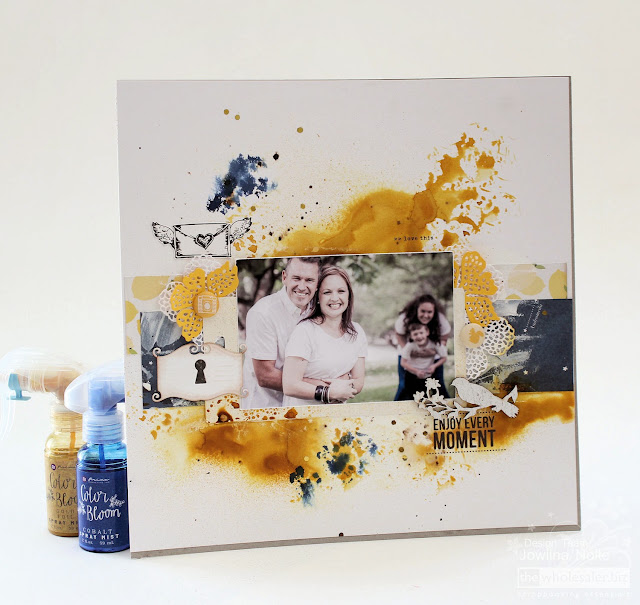
For this layout I created a really busy background using inks and
patterned papers. I wanted to add some soft flowers, but that didn’t
work with the background so I opted for some die cuts to dress up my
layout and finish it off.
step 1- I used the beautiful Prima flower die cuts and cut 3 large flowers out
of smooth white AC cardstock. I left them white as is. To make the
delicate cuts release easily from the die, I used Quick release paper
between my die and cardstock.
 step 2 - I then cut some yellow flowers using yellow smooth cardstock. I cut the
yellow flowers in half since I was only tucking them under my packaging
piece used for my photo matt.
step 2 - I then cut some yellow flowers using yellow smooth cardstock. I cut the
yellow flowers in half since I was only tucking them under my packaging
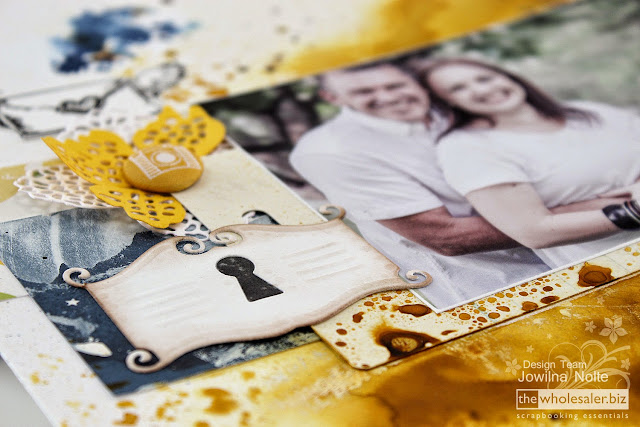
piece used for my photo matt.step 3 - Cut the ‘locked’ die out of smooth white cardstock and ink the edges using brown chalk ink and a sponge dauber for a distressed look. TIP: to create an old world distressed and rusty look on my key hole die, I could have used a combination of embossing in silver and black dye inks, but I wanted it to be clean and fresh and uncomplicated.
step 4 - Adhere two strips of patterned paper to your background cardstock. Add a layer of white gesso to the papers to make the ink adhere better to it. TIP: Gesso creates ‘tooth’ for ink and mist to adhere better to paper and cardstock as well as other surfaces like canvas, wood, metal, plastic.
step 5 - Position your photo matt, in this case my packaging piece and the die cut elements onto your prepared background to determine the correct placement. I tucked the flowers under the top left and right hand corner and then adhere them using two large brads. TIP: By leaving the die cuts loose on your layout, you create movement and dimension.
step 6 - Add mists and colour to your background using Prima Colour Blooms.
step 7 - Once all the inks are dry, adhere your photo in place. Adhere the ‘locked’ key hole die on the left overlapping your photo. I cut a second lock out of grey cardstock and adhere it in the keyhole. You can also just back the keyhole bit with patterned paper behind the opening to add colour and dimension.
step 8 - Add a second colour to your background using a second colour of mist as an accent colour. Finish off with additional embellishments.
PS: to minimize the buckling of my layout after adding all the inks, mists and mediums, I adhered it to a piece of grey chip using my Tombow glue stick making it really smooth and firm.
 In a few easy steps I added some gorgeous details using cutting dies on a layout – simply cut out of cardstock – quick and easy.
Products Used
- PM 572846 Prima Die – Flowers Cluster
- ULT 157139 Ultimate Crafts Celossia Cutting Dies – Locked (64 x 38mm)
- ULT 157149 Quick Release Die Paper
- AC 369205 Dear Lizzy Serendipity 12×12 Paper Pad
- PM 573805 Color Bloom Spray – Gold Foil (59ml)
- PM 573898 Color Bloom Spray – Cobolt (59ml)
- AC NEUTRALS 71793 AC Cardstock 12×12 Smooth – White
- PM 961442 Finnabair Art Basics Heavy Gesso – White (8.5 oz)
- PC 2000293 Cuttlebug V2
- TB 01494 Tombow Colour Glue Stick
- Other: Crate Paper Open Book Brads, Stamps, Crate Paper Open Book Rub-Ons, Flower Packaging


0 comments