Life | I am back

I have stepped back and taken some personal days - hard to believe as life still went on I just didn't get around to blogging regularly. And for now that is OK. Thanks for hanging out though - i know how frustrating it can be if nothing happens in blogland, but sometimes we just need to break away.

I have this fun Spring inspired tag up on the ImagineCrafts blog. Spring - yes - don't you just love that some parts of the world get to see new blooms as we head into winter with some colder weather, which I am looking forward to.
Hop on over to see the full article as well as the latest technique articles using the fabulous imagine Crafts Tsukineko products!

In the meantime I have packed some 600 + kits for various events and classes I will be teaching in the next two months. And if you know me really well, you can imagine how bored I was with the whole process. But also relieved that it is done so I can concentrate on the fun stuff....like playing with some really cool products I received. More about that tomorrow.... such awesome and exciting news to share. Have a wonderful creative day!

Couture Creations 2 Way Glue – A Sticky Affair!

Are you always getting stuck looking for a really amazing adhesive? Well we have some amazing news for you. Today we are introducing the new Couture Creations 2 Way Glue pens – giving you twice the solution to sticky messes.

I tested the glue pens on a quick tag I made using some of my favourite products from The Wholesaler. I used the larger pen tip as a wet permanent bond glue for my larger elements and matts, and then the smaller pen for my fussy cut elements that I wanted to be repositionable. Both options that I like having in my bag of tricks.
Step 1 - Cut out images from printed paper, journaling cards or use photos for your project.
step 2 - Use the large 2 Way glue pen for the large pieces you are adhering. TIP: To start off using the glue pens, you need to push the pen tip in several times to activate the glue. The pen tip will become white as the glue seeps into the nib.
 step 3 - The large pen tip is perfect for adding adhesive to larger pieces like photos, journaling cards and other flat elements. The large tip spreads the glue evenly in a thin layer.
step 4 - Add glue to the postcard element using the large 2 way glue pen.
step 5 - TIP: I used this glue wet. Adhere the element to brown cardstock while the adhesive is still wet for a permanent hold.
step 6 - Use the smaller 2 way glue pen with the small nib for smaller cut out elements for detailed work.
step 7 - Add glue to the cut out elements using the glue pen and set them aside to dry first.
 Once the glue is dry adhere the elements to your decorated tag – I can move the elements around until I am happy and then leave them in position to dry for a permanent hold.
TIP: The 2 way glue is really great for people who battle using very wet adhesives. It enables you to let the glue dry first before committing to placement on your project, and lets you move things around for that perfect fit. Giving you time to adjust certain elements will take the stress out of getting things stuck.

Xyron serviette covered tag background.

Here in South Africa it seems like everyone is gearing up and getting ready for autumn. It feels strange ’cause we are still having extreme heat in some parts of the country. And just so came the inspiration for this next tag. I was recently given a gift that had this lovely serviette inside the packet – and I just didn’t have the heart to throw it away.
I loved the blue background with the oranges on it and hints of green. For years we have adhered serviettes to our projects using different mediums – but the easiest is still using the Xyron machine.

For this project I used my Permanent adhesive cartridge.
step 1 – insert a blank manilla tag into the Xyron – keep in mind that the adhesive will be adhered to the top of your tag – in this case my tag is blank so it doesn’t matter at all.
step 2 – Turn the handle and feed the tag through the machine. Make sure that the tag goes past the cutting line, and then cut off the cartridge strip.
step 3 – Peel the front clear plastic off of your tag – the top of your tag will now be tacky.
step 4 – Split your serviette so that you only have the top design. Place the serviette onto your tag and smooth it out using your hands.
TIP: Be careful not to tear the serviette as they are quite fragile and delicate.
step 5 – I don’t mind having creases in my serviette – this adds to the look and gives some texture to it.
To decorate my tag, I die-cut 2 trees – use the same die-cut and 2 different colours of cardstock. Send the trees through the Xyron machine one at a time and adhere them together slightly off-set, then adhere the tree to the tag along with a sentiment circle, button and diamante.
And there you have a quick and easy tag – recycling some beautiful serviettes!
The Xyron machine really does make life so much easier when things need to be stuck in place.
Acid-Free Permanent Adhesive Refill Cartridge xt1605
5″ Creative Station xr0510
Contact your closest craft store to find out more about the Xyron range of products by Chiswick!

Summer time tag with burnishing paste.


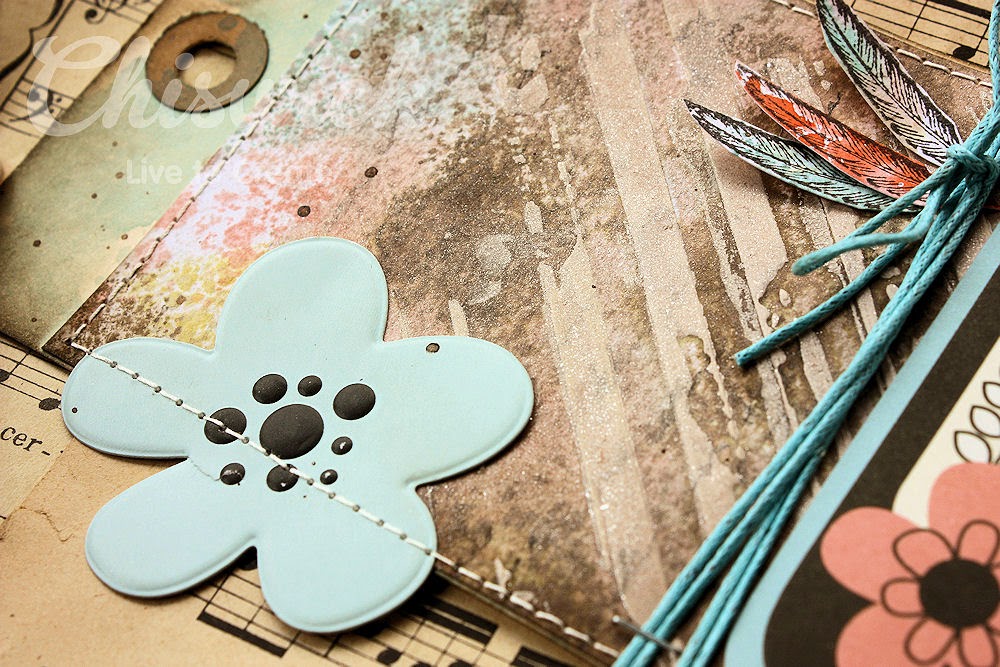
Summer is here and with the versatile sticker range from Chiswick you can create gorgeous summer projects! So this week I wanted to create a tag with some pastel undertones – light and fresh. What essentially started off as a dark base turned out to be just perfect once i added some Burnishing paste to tone down things a bit.

I started off by creating a patterned background using Gesso and a Heidi Swapp stencil.
 i then added some colours using dye inks – brown, orange, green and yellow combined. I left the ink to dry completely highlighting the Gesso stenciling.
 Next up is where the magic really happens – I covered the entire piece of cardstock using Metallic Bronze Burnishing paste from Chiswick. The colours are still visible but toned down with a beautiful bronze shimmer to them.
 I added some background stamping using a script stamp from this gorgeous stamp set.
 and lastly i stamped some feathers onto the technique scraps created for my background. I used my versatile Chiswick scissors for the fine detailed cutting.
 i used the range of stickers to assemble my tag together with my stamped feathers and some embellishments.

 dimensional stickers combined with borders and flowers – delightfully summery!

I used these wonderful projects for my summer tag – available from your nearest craft store or visit www.chiswick.co.za to view all the products.
Craft Guillotine 6.25″
Burnishing Paste 25ml BronzeA2 Cutting Matt
Embroidery scissors
Embossed stickers
Layered stickers
until next time – I hope your summer is amazing!

Feline gift tag - stencilling and stamping on a burnishing paste background.

Welcome to another fun post creating with the wonderful Chiswick products. I have some work colleagues coming into town next week and one of them is a cat lover, so what better way than to welcome her with a little feline love! And the great news is that Chiswick has an entire stamp set dedicated to cats! So by now you always know how much i love the Chiswick inks and burnishing paste, and i thought it appropriate to show you how to make your own glitter cardstock instead of buying the commercial version. I really believe in multi purposing my products and so i always try and find as much as i possibly can to do with any one product. That way i can justify my expensive instead of buying things that end up never being used – i believe you have to fully utilize it if you spend the money on it.
So to start off i used some stencils on my background. Stenciling is all the rage now and very fashionable. And I was super excited to see how well the Pearlescent ink pads work for stenciling together with a sponge dauber.
Once i was done stenciling i used my finger tips to apply a thin layer of Gold Burnishing paste to the background. I used a smooth cardstock so spreading the paste evenly over the entire background was very easy. You can see how the white cardstock changes to a off-white with a slight shimmer – it’s quite hard to capture the shine on a photo but in real life it is magical.
TIP – keep in mind that the paste will leave the cardstock even smoother than before and it’s almost like it now has a protective oily layer on top of it
I then stamped my feline image in the center of the cardstock piece. Because of the burnishing paste layer, the ink created a funky ‘halo’ around the solid cat image and also prevented the ink from drying immediately like it normally would.
I used my heat gun to simply heat set the ink of the stamped image before continuing to decorate my tag. Heat setting it dries the ink immediately preventing any smudges
I then trimmed down the image and matted it onto pink cardstock and patterned paper before adding it to my tag.
 I also die cut words in the Chiswick cardstock – i cut a black and pink word and then layered them on top of each other slightly off-set.
A quick and easy gift tag for a lovely cat lady.
 cool and creative in a few easy steps

and here’s a list of the Chiswick products i used for my tag

Pearlescent Ink Pad – Brown rs3350 Clear Stamp – Feline Script 140 x 180mm (ER-A14) rs3170 Burnishing Paste 25ml – Gold pa2190 Textured C/Stock 216g 12″ X 12″ Lipstick 10 Shts/Pck sb4990 Textured C/Stock 216g 12″ X 12″ Black 10 Shts/Pck (131) sb4965 Heat Gun in Gift Box cr1350

Remember that all these products are available from your local craft store, and if you cant find them please ask for them by name and code.
In search of your local craft store, then contact Denise 031- 569 5673
and she will be able to assist you
For more info on all Chiswick products you can visit www.chiswick.co.za
until next time – have a wonderfully creative week!

Chiswick - create backgrounds with a basic tool kit.

Hello again - hope you are having a creative week. this week i got to play with a firm 'old-school' favourite. it's one of those tools that you can't live without even if you are a seasoned crafter! The 9pc Eyelet tool kit is functional in so many ways, but this week we are using it to create custom backgrounds - you can repeat this same technique on your cards, layouts, tags and other crafty projects. and as always you can pop along to the website here to see all their crating goodness.
I created this tag using an inky background, and then used my eyelet tool to make different sized holes into the tag itself, before backing it with a bright and cheerful pink cardstock for a 'pop' of colour. i used pink as an accent colour here to compliment my greens and blues.
To start off gather your toolkit and the working pad - this is so that even when you make holes, you don't ruin your pink Chiswick cutting mat with loads of different marks on it. Insert the hole size you are going to use first by screwing it into the handle tip.
Place the handle with the nice soft grip on your tag in the position you want the hole. Use the craft hammer and pound onto the back of the handle. Once should be enough but may require more blows depending on the surface or pressure.
TIP: i recommend you do this step on a nice firm surface or even on the floor to avoid making too big a noise when you are doing this late at night!
Once you are done and happy with the placement of all the holes, add adhesive to the back of your tag and adhere it to a sheet of pink cardstock. The cardstock fills in the holes and adds a nice colourful pattern to the background.
you can create fun elements using this method i.e Print a swirl on paper and then use it as a guide to create a pattern using your eyelet tool to make holes in the swirl. the printed swirl will act as a template only. remove the printed swirl to reveal your swirl consisting of holes. then back it with patterned paper and you have a custom element for your cards or layouts
combine your holes with buttons, diamante and pearls for a gorgeous effect.
to add some detail to your cardstock use a white ink and add white splats of ink to it before using it behind your holes. this will make for a fun effect peeking through
a fun way to use those favourite tools! oh and you could of course add an eyelet or two to the holes to make them even prettier adding texture and colour at the same time!
Chiswick Products used
9Pc eyelet tool set cr1100
Burnishing paste 25ml Verdigris pa2240
Dye ink pad - brown rs3299

to find your closest craft shop stocking your favourite Chiswick goodies contact
Denise on
031- 569 6116 or visit www.chiswick.co.za

Couture Creations - Botanical gift tag.

Welcome to my first post for the Couture Creations Design Team - so exciting!
When I first laid my eyes on the quick release die paper I couldn’t believe that you would actually want to waste such pretty stuff! I mean seriously how would I cope? But then I started thinking, yes sure I could use small pieces for those intricate dies, but I would much rather use it to create something pretty like a gift tag or card. And so that’s what I did

I added a decorative strip of plastic die cut to the bottom of my tag for visual interest
the Sew Jo patterned paper worked perfectly under the delicate plastic strip adding colour and pattern without being invasive
hand dyed ribbon, buttons and a stamped sentiment was used a decorative details
the embossing adds a hint of texture - this may be my new favorite embossing folder
Here's how i created the elements for my tag
For the bottom of my tag i wanted to add a decorative strip. I used the packaging from one of my embossing folders and simply cut a piece of plastic from the front part. I used the Art Deco Border to cut the plastic packaging into a delicate and decorative edge
to add colour to the plastic packaging i used alcohol inks. The die cut strip was sewn onto the tag over a strip of patterned paper from my Sew Jo paper pad
I coloured my manilla tag with distress paint to add some colour to the base. You can use your heat gun to dry the paint quicker but i prefer letting things dry naturally
Once the paint was dry i covered the entire tag with a layer of adhesive - because i did not want the adhesive to show through the release paper i used a glue stick. I added the release paper and then burnished it to make it stick to the tag permanently. Trim off any excess release paper from the edges of your tag using your Couture Creations scissors.
Emboss the tag using the Velvet Tea Lights embossing folder. I love how the embossing adds a subtle texture to the release paper without interfering with the design on the paper at all
i hope you are inspired by this beautiful range of products and the stunning release paper!
Couture Creations Products used

Popular Posts

Like us on Facebook

Flickr Images