3/25 - double embossing.

One of my favorite things to do with my embossing folders is to use 2 designs together on the same piece of paper.This does not work equally well with all designs of embossing folders and with all techniques it came about with trial and error and finally success.
tip # 3 - use two embossing folders to create a texture
1. Choose your piece of cardstock plain, inked or printed
2. Choose your first embossing folder and emboss onto your cardstock through your Cuttlebug
3. Remove from the embossing folder and place into the second design embossing folder
4. Emboss and remove to reveal your double embossed image
Tips and tricks
As i said it doesn't work as well with all designs. I have found that combining a "dot" with any other design gives the best results.
When you emboss the first design it will look normal - "embossed", but once you add it through the Cuttlebug again using a second embossing folder the first design will be flattened from the pressure but will still be visible - magic i tell you!
For my sample tag i used the "Sugarplum Ball" embossing folder first and second the "Grunge Dots". you can clearly see the sugarplum design visible in the background but flat, and the grunge dots on top nice and dimensional.
this is one of my all time favourite techniques with my embossing folders - i hope you will have fun trying this technique and experimenting with your different embossing folders to create funky backgrounds.

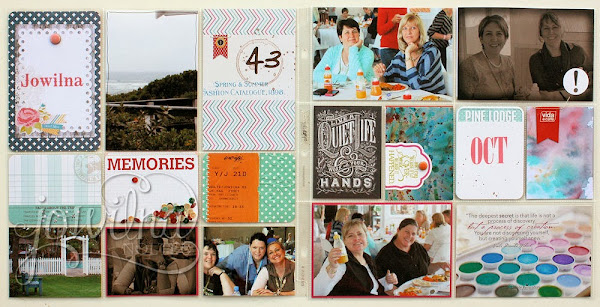
Project Life week 43.

Still going steady with project Life layouts in between my regular scrapping- everything that needs to find a home finds it here which i love so much. This spread captures the week leading up to a scrapping event In PE by Scrapbook Studio and the actual weekend and traveling.
I combined the Project Life Mini Kit - Childhood (100 Cards)  with Project Life Core Kit - Jade (616 Cards) for this spread. I like mixing things up and the colours worked perfectly. I also used some Prima paper and pieces of paper i made myself using different inks and techniques.
Anel the clever event co-ordinator even cut special "Pine Lodge" journaling cards for the 30 ladies i taught Project Life to so they could include it in their albums as well. Love that!
how are you doing with your PL? hope you are having a creative week.

2/25 turn your die cuts into cost effective stencils.

So you've bought all these lovely dies to die cut pretty shapes like flowers, butterflies, hexagons, circles and.....you get the idea. No sooner did you receive your beautiful shipment of new dies and the next craze hits the scrapbooking world - stencils.
tip #2 - turn your die cuts into stencils
1. Use your die to cut your shape out of the selected cardstock. Ink, emboss or use as you please.
2. Use the left over piece together with a sponge applicator and ink pad to ink through the cut out section directly onto the background of your layouts, cards, tags and even on white spaces on photographs.
Tips and tricks
This is the cheapest stencil you will ever own and you can throw it away without feeling guilty when it gets mucked up.
To cover an entire background, simply rotate and move the stencil and ink again using different colours and different mediums.
Avoid inking over the straight edges - and if you are scared you will, then simply extedn your stencil with some clear acetate or cardboard around the outside edges only.
you can also die cut your shapes out of a larger piece of acetate for a more permanent and durable stencil that will last for longer.
i can create beautiful unique stencils to my hearts content - i have the equipment i might as well use it to the max.

1/25 - Add tape before you die cut delicate and detailed images using your Cuttlebug.

Welcome to tip # 1 using your Cuttlebug and dies
I hate a big mess with adhesives, and can't stand it when glue seeps from underneath a great piece of art work.So what do i do when i want to die cut a delicate piece...
1. Choose your patterned paper
2. Adhere strips of double sided tape to tha back of the paper large enough to cover your die
3. Place the die onto your cutting plate, then the paper face down and send through your Cuttlebug
4. Remove the die cut paper from the die
5. You know have a ready to adhere die cut element - no fuss no mess
This is such an easy thing to do and yet people are still struggling with liquid adhesives. this quick and easy way will save you lots of time.
if you have a sticker maker machine that works too, but i have found that they also have limitations, where this way i am yet to find any issues.
so there you have it - add tape to die-cuts even before cutting....

what is walnut ink?

I love a good ink – and this is my absolute favourite for various reasons. It’s subtle and effective and can be applied in a myriad of different ways. Yes it’s brown but in all its glory it can turn the best of projects into something a little grungy or make an old world element out of something new. It’s versatile and easy!
Walnut ink is a natural ink derived from walnut shells or husks, and can be used to dye or stain paper, chipboard, and even fabric! 
They must be dissolved in warm water in order to become ink. 
The more water you add, the lighter the ink but you have to remember to keep its consistency thick enough to prevent it from running. 
It is water soluble, so it easily washes off of your hands (and work surfaces), and can also be diluted with water to create different variations in the depth/strength of it depending on application and use.

Smile card
I used AC smooth white cardstock for the base of my card and stamp a pretty Prima border using Versamagic ink. I added the green using watercolour paint. The new range of Celebr8 chipboard letters are so cute and make for a perfect title to this card. The letters were sprayed using Walnut ink Crystals and left to dry.
I also used my ink to add tiny splatters to the background by removing the nozzle from my spray bottle and lightly tapping the front of it to transfer the ink onto my card. A beautiful fine mist breaks the starkness of the background and adds loads of interest.


A few other things you can do with Walnut ink
You can wipe it on papers to age them - this works really well with torn edges and a paintbrush
You can dip your tags in walnut ink then let it air dry
You can use the ink with a wax resist technique.  You can write a date or draw a pattern on your tag or paper with a white or light crayon, then wipe across the paper with the walnut ink and this will reveal your pattern or writing dramatically.  Remember to draw firmly with the crayon
Putting your walnut ink into a spray bottle gives you added options.  You can sprits it onto the paper for background color, or use a template or stencil and spray over that template producing the words or shape in the walnut ink
Or remove the nozzle from the bottle and ink splats to the backgrounds of your projects for a beautiful splattered effect
Crumple your cardstock and apply walnut ink, the creases attract more of the ink

After colouring your paper or cardstock using Walnut ink Crystals you can use other mediums to create added interest
Water drops splattered or sprayed onto the ink will create interesting effects
Straight ink crystals sprinkled onto slightly wet inked surfaces will create darker random spots
Salt – apply salt to the wet walnut ink on your papers, this produces a resist effect
Use bleach on the ink for a whitening effect


About my tags
I used Walnut ink to colour my tags to change the colour and give it in aged look. My first lighter tag was lightly misted with water after a light colouring and then sprinkled with dry Walnut ink Crystals and let it dry. The crystals added afterwards add darker patches making it more interesting. The second tag was misted again with a darker variation of crystals (less water in the mixture) and left to dry. These make wonderful gift tags or labels in your studio – with perfect vintage colouring.

Products used Walnut Ink Crystals [TWI-001]
Matt Board Alpha Pack - Design 2 [C8 MB4202]
Matt Board Alpha Pack - Design 4 [C8 MB4204]
Prima Mixed Media Background Stamp [PM 910297]
VersaFine Ink Pad - Onyx Black [TVF-82]
Other: tag, watercolour paint

25 days of Cuttlebug tips and techniques.

so i had this crazy idea to do 25 techniques and tips using my favourite die-cutting machine - The Cuttlebug! along with this crazy idea was to use if combined with my December daily album so that i could get everything done in 25 days and be good and ready for December. [insert LOL] anyways so i am off to a slow start, since by now i have done so many Christmas events and layouts and cards i could move right on to Valentines.
so here's where i am at. we will officially start tomorrow with the first tip. but if you are new to scrapbooking and machines here's a little background. 
i first fell in love with the green machine at it is affectionately referred to in my house with the V1 model. the machine was green which was a shock to every scrapper who had a pink room (not me) but it worked. it was a sturdy machine that would stand the test of time. and if you are like me you will try just about anything in this little sucker. and even after 7 years i am yet to be disappointed by it's strength and versatility. but why i like this little guy so much is because i use it every day! it's small and compact but big enough to emboss and cut almost anything apart from the obvious large dies. it folds into a tiny manageable size and fits into most cupboards easily. you can use other dies and embossing folders with it without a problem and above all it is a really good price.
with the V2 model came a slick and sexy machine - same sturdy and hard working, affordable machine.
here are a few tips you will need to know:
  • the Cuttlebug has a suction function so that when you unfold the base to open the machine it will sit firmly onto your smooth work table
  • the plates in the machine are used to build up the height needed for either embossing or die-cutting
  • the plates need to be aligned on the front and back for the machine to work correctly. if the plates are lined up correctly and inserted the handle will start turning on its own and you know you are good to go
  • the sandwich configuration - the order in which the plates are stacked - is very very important. if done incorrectly it may damage your machine (i experience this in a class once - and very unpleasant)
  • apart from that this machine is so easy to use! 
so if you are considering buying a machine or have one, then stick around or come back for a visit to learn my easy approach using this versatile little bug. until tomorrow....

Popular Posts

Like us on Facebook

Flickr Images