something cute

I am not really into cute - don't get me wrong..I Love all those beautiful Magnolia and Tilda stamps with their cute images. They are truly gorgeous and they make for some seriously stunning cards. I however don't own many cute stamps apart from the PSX range - only because I worked for the company who imported PSX stamps and they had some seriously beautiful stamps. So the other day I found this image amongst some ready stamped and embossed images from way back when. And so Mr mouse became a cute card.

The image was stamped in Black memories ink and then coloured with my Winsor & Newton watercolours. I love painting and so have not really made the transition from
paint to Copic markers. The fruit and veggies were highlighted with
orange and snowflake glitter on top of the paint.

Hope you have a peaceful Sunday afternoon!

Stamp Camp sneak preview

Every year in October we have our Cardmaking retreat or Stamp Camp as some of us call it. A very informal get together with loads of stamping and crafting enthusiasts who attend the 3 day camp doing 6 different classes and projects. Here's a sneak preview of my little project to get people in the mood - although we are fully booked three months in advance! This is only the one part of my project and the fun stuff is inside! Once camp is over I will post some more photos and instructions. Have a wonderful weekend everyone! Look out for the winner of the Tim Holtz goodies on Monday!

Adirondack Colourwash Batik effect

This is one of my favourite techniques to do with Adirondack Colourwash from Ranger. I love the effect and how you can change things around and experiment for different looks. It also comes in a huge variety of colours so you can really go to town. A simple layout but with a nice technique adding some interest.


1. First stamp your image or lettering onto cream mulberry paper with Versamark.
2. Heat emboss with clear embossing powder until the powder is fully melted.
3. Place the mulberry paper on your craft sheet and spray the mulberry paper liberally with the Colourwash of your colour until it is fully saturated.
4. Once the Colourwash is dry, cover the embossed areas with a piece of scrap paper and iron with a very hot iron.
5. Check to see if the embossing powder has melted totally by trying to lift the scrap paper. If the paper lifts then you are done - if not keep on ironing.
6. Cover a piece of white cardstock with a glue stick and adhere the embossed and coloured mulberry piece to the white cardstock.
7. Use on your project as desired.

Supplies: Adirondack Colourwash by Ranger Industries. Foam lettering stamps by Making Memories.

in anticipation of spring...


Waiting for spring as the trees in our garden are showing small little green fluffs that I only noticed this morning. So I thought I would share this spring project I did a few years ago. The handbag itself is made of tin that I covered in pretty K&Company paper (who remembers that line?). The paper was basically modged to the 'tin'. The V-flap on the front and back was covered in paper and silk flowers decorated with buttons and brads. On the front,on top of the paper flowers is an acetate butterfly decorated with glitter glue.
Now the handles were a different story - as I recall it took me about 7 nights to cover the handles in little ribbon knots...what was I thinking? Every night after work I would tackle the handles and a couples of hours later it still looked and felt as id I was never going to finish.
And who the hell actually appreciated this spark of genius? The ribbon I used was a tiny 3mm embroidery ribbon - now had I used a thicker and bulkier ribbon it might have been a different story all together! Once the baby was done and decorated I took it to have flowers put in for the photo shoot...those tulips really were magical! Ok...so still waiting on Spring ...

Quick Cards

I have been in a cardmaking mood for a while now - it just seems that for now they are uncomplicated and easy. I also have a couple of layout kits left from earlier this year and decided to use them as inspiration for a card kit. So from the cardstock ribbon, paper, and other embellishments included in the pack you can make about 16 cards. Not bad at all! This card is made with the paper and embellishments with only a stamped image and sentiment added. The stamps my newest and most favourite I got a couple of months ago from my friend Shamela in Cape Town - it's a Penny Black stamp - my first ever but certainly not my last. It really was a bargain buy at only about R90.00.
I am also doing a couple of card classes in the next few months amongst others. So hop on over to Sweet Scrappins in Pretoria (for the locals) and enquiry about their classes. The card classes are going to be loads of fun and I have some different and exciting ideas planned for them. Hope to see some of the regulars there.
Supplies: Patterned Paper K&Company. Cardstock Canson & DCWV. Sentiment KI Memories. Stamp Penny Black. Ink Versafine. Other Brads & diamantes.

Paint swatches and the swine...flu

ok..I am down! Not sure if it really is the swine that got to me or maybe just the fact that my house is somewhat of a pigsty at the moment with all the projects going on? Huh?
Anyhow I have all the symptoms and should maybe have it checked out. Or maybe it is just the sleepless nights from having our fence cut, broken in and being kept awake by the flood of daylight farm attacks around our area. It's all so senseless but being kept awake by these buggers is not fun. Our alarm kept on going off four five times a night with a dead short - this means it has been cut (which it was in several places including our bottom gate only meters from my front door)...testing to see the response time of the security company and followed by quite a few gunshots...aaah nothing like living in good old Africa!
So needles to say I don't feel very colourful and have been sleeping for the last three days! But came across this layout this afternoon while doing some meaningless browsing for inspiration. I loved doing this layout. I used paint swatches from the local hardware store (where I am now thoroughly watched as I approach the paint section) and stamped onto them using black Stazon ink. Each colour swatch is then followed and supported by flowers in the same colour and finished off with an embellishment as well. The chipboard title was coloured using Chalk ink pads in the same colours. A quick and easy layout..and economical until you get to the part of using loads of brads and flowers!
**Here's a tip for...visit several different hardware and paint stores when collecting your swatches - especially if you live in a small town like we do. They get quite funny when you keep on going back and collecting more - apparently not everyone can see the crafting potential in these little beauties.
Have a wonderful and SAFE weekend!

Tim Holtz give-away

Give-away
For this layout I used a combination of different embossing techniques to show how versatile embossing can be and some of the different ways you can use it on your cards and layouts. All products used are ranger products.

Ok...here's what you need to do to win a wonderful Tim Holtz hamper filled with lots of goodies.
Click on the above layout to view it larger...
Then count the different ways that I have used embossing on the layout...some are hidden so be careful when you count
Leave a comment on this post with your count, name and email...
Go to Tim's blog and leave a comment
The first correct entry will win the wonderful hamper - provided you have left a comment on Tim's blog as well as on this post...

Have fun and good luck!
Winner will be announced on Tuesday the 1st September 2009.
**I will post the give-away to anywhere in the world but limited to weight, size and postage from South Africa.

Scrapbook Convention


Bookings are going through the roof and with limited numbers this year for the September event I suggest you book asap. The line-up of teachers and products are fantastic and many firsts!
A first for lots of the teachers....
a first for some of the manufacturing companies....
a first time for new scrappers....
first to see new products....
So hop on over to Scrapbookex.co.za and download your booking form today - because tomorrow may be too late. Glenda is putting lots of effort into organising a wonderful event with lots of attention to detail as usual. And if the Tim Holtz event in May was anything to go by - it is going to be the social event of the year for scrappers. 'Cause lets face it - it you are not at the convention you are sure to miss out on all the fun and the opportunity to just chill with friends and enjoy some quality scrapping time....

thoughts ...

OK so looks like we are back in business....it took about 3 seconds to upload this photo this morning! WOW! Anyhow..the last of the puppies are leaving the nest. It is hard to believe that we have come to love twelve little fluffy creatures and now they are all gone - hopefully they have all gotten really good loving homes!
This time of year seems to be on a downward slope...time goes nowhere and things are just happening too fast. Lots of exciting things on the cards though and lots of projects to work on for now and next year. I have also managed to purge some more stuff - although it be onto a friend who has loaded her car filled with magazines, projects, frames and stuff to take back to their new larger and improved shop. And talking about their shop...I thought about Amanda Harrod who is born to shop. Well by day 2 of shopping paper and embellishments and flowers and stuff I am sick to my stomach...literally! I wish Amanda was here to help - being a focused shopper and a professional we could have used the helped. Don't get me wrong - we did manage to spend a huge amount of money and fill a 4x4 to the roof! Not bad at all. However...has anyone had enough of the road works in Gauteng all in preparation for 2010. Man I would rather stay home than be stuck on the highway one more day! Well that's me for this mroning! Lots of projects to photograph today and then some creative blogging...and with the internet connection being fast again I can upload a stack of photos! Yeah-hah!

Painfully slow internet and some ATCs

Our Internet has been painfully slow for over a week now. Funny how the rest of the world especially the USA has such quick Internet access and unlimited it seems. Logging onto the overseas blogs are painful for us here in Africa - they take ages to download and then at the end of the month you pay your a.... off for your Internet subscription! I hope this will soon change for the better - maybe then updating my blog will be a pleasure instead of a chore. This is not always the case - some months and weeks our connection is so fast and you download 1MB a second - FRIGHTENING when it comes to billing time! but a pleasure for blogging! Now why would that be I ask you??
Anyhow..after a really tough week things seem to let up a lot with a great offer just to get worse!! But that's a story for another day!
Here are some Artist Trading Cards I made ages ago. The theme for the swap was 'Winged Things' and these were just some of my then attempts!
I love working with alcohol inks. This background happened by pure luck or mistake. I spilled some alcohol inks onto old book paper and the result was really cool. I stamped the images onto clear tacky plastic, added a few silver leafing flakes to the sticky side and covered the background with it. Pretty easy but really effective.


I love ATCs as you can simply experiment on a small scale and chuck the flops and keep what you like - or simply give them to someone who will not know any better!


I hope everyone is having a creative day!
Look out for some awesome TIM HOLTZ give-aways on my blog here at the end of the month - courtesy of the man himself! Such a generous soul!! Thanks again Tim!


Better photos

I by no means claim to take perfect or even good photos - for several reasons. 1. I have always wanted to become a photographer and have a real passion instilled by my late father but never got there. 2. I have only one lens for my current camera - a 2.8 100mm Macro lens. This in my humble opinion is one of the best lenses you can own for macro photography - but for taking photos of layouts cards etc...well ... The reason I have this lens is because I love the fact that you can zoom in on a specific part of your project for a close up and it blurs the rest of the image - that is my kind of photography. I however do not own a normal 50mm lens - but it is on the wish list along with the new Nikon D3X that prices around R95.000.00 currently - this little baby won best digital professional award for 2009 - need I say more...
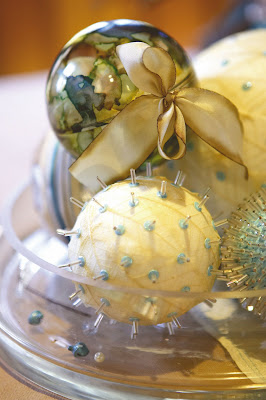
But here are some tips for those (like my friend Cariena)for taking better and more pleasing photos - and lets face it we can all learn something everyday...and that includes me.Photo: Christmas Baubles - polystyrene covered in skeleton leaves and beaded pins. Acrylic bauble coloured with Alcohol ink by Ranger Industries. My favourite ribbon - Hanna Silk from Japan all placed in a glass bowl and beads and bells scattered inside.
How to take photos of your art

1.Take the picture using the highest settings and resolutions available on your camera. You can always reduce the image size but this way you are starting with the best possible photo.

2.Don’t use a direct flash, or you will end up with ‘hotspots’ in your photo, where excessive light glares off your subject. If you don’t have lighting equipment, try to take the photo in bright, diffuse sunlight instead. If you absolutely must use the camera’s flash, put your finger over the center to tone down the glare.

3.For small artwork, lean over the picture and take the shot from above - get on a chair for this if need be. Otherwise you can mount it securely on a flat surface and use a tripod or other stand to hold your camera at the same height. Let the artwork fill as much of the camera lens as possible - this avoids any colour corrections taking the background into account.

4.Use a backdrop. This way you eliminate unnecessary background details from the photo. Black velvet is the best choice because it absorbs light, but a plain white background works too. Avoid patterns and awful colours that will clash with your art work.

5.To get the sharpest photos, use a remote or the timer feature on your camera to eliminate the natural shaking of your hands when you press the shutter button. It’s easier to correct colour and exposure than a photo that is out of focus.

6.Experiment with the settings on your camera. Take several shots of each piece with different exposure and shutter settings until you learn which ones work best for you. The only way to learn is to keep trying.

7.If your artwork is small enough and flat enough you can use a scanner to get a crisp, high-resolution image too.
8. Use a photo editing program to do a one-step photo correction that will fix the colour, lightness, hue, saturation etc and even remove the white fuzzy layer that digital cameras sometimes places over your images. You can also correct distortion and straighten your image.

OK that in short is some tips that have helped me over the years. And maybe by next year I can add photographer to my resume! Here's to wishing and dreaming and hoping - and one more thing to live for. Happy photography!

Popular Posts

Like us on Facebook

Flickr Images