Create double page Christmas layout.

Today I am sharing my double page layout in the last issue of Create magazine. I used a combination of really old and slightly old patterned papers. This is one of my most favourite ever layouts simply because I could use what I had on hand instead of trying to compete with the Jones' and buy all the latest products and fancy embellishments.
The only new paper I used was the star pattern from Lady Pattern Paper at the bottom of the layout. I love the simplicity of the layout as well as all the little details using die-cuts, inks and stenciling with modelling paste.
How are you doing with your Christmas preparations?
And have you completed your festive layout yet - then simply add your photos from Christmas day and you are good to go.
Until tomorrow.... thanks for stopping by.

Details with cutting dies on a layout!

The more I use my collection of dies, the more I fall in love with them if that is even possible. I mean I really love the designs, but sometimes it is just an effort to pull out all the bits and pieces and actually use them – do you sometimes have that feeling? I know you do!
So in an effort to love my dies more and use them more, I have opted to keep my Cuttlebug machine on my desk permanently and that have made all the difference.
I started using my dies more and I love the simplicity they add to a layout, project life pocket and card – making such a huge impact. And the best part, you don’t need to do much to them to make them come into their own right.
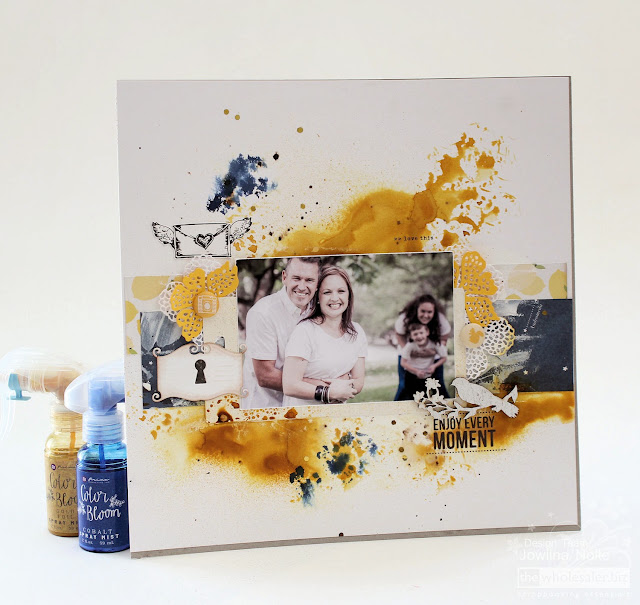
For this layout I created a really busy background using inks and patterned papers. I wanted to add some soft flowers, but that didn’t work with the background so I opted for some die cuts to dress up my layout and finish it off.

step 1- I used the beautiful Prima flower die cuts and cut 3 large flowers out of smooth white AC cardstock. I left them white as is. To make the delicate cuts release easily from the die, I used Quick release paper between my die and cardstock.
step 2 - I then cut some yellow flowers using yellow smooth cardstock. I cut the yellow flowers in half since I was only tucking them under my packaging piece used for my photo matt.

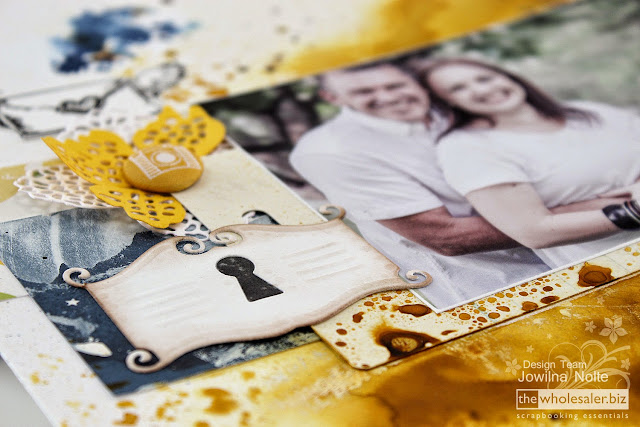
 step 3 - Cut the ‘locked’ die out of smooth white cardstock and ink the edges using brown chalk ink and a sponge dauber for a distressed look. TIP: to create an old world distressed and rusty look on my key hole die, I could have used a combination of embossing in silver and black dye inks, but I wanted it to be clean and fresh and uncomplicated.
 step 4 - Adhere two strips of patterned paper to your background cardstock. Add a layer of white gesso to the papers to make the ink adhere better to it. TIP: Gesso creates ‘tooth’ for ink and mist to adhere better to paper and cardstock as well as other surfaces like canvas, wood, metal, plastic.
step 5 - Position your photo matt, in this case my packaging piece and the die cut elements onto your prepared background to determine the correct placement. I tucked the flowers under the top left and right hand corner and then adhere them using two large brads. TIP: By leaving the die cuts loose on your layout, you create movement and dimension.
 step 6 - Add mists and colour to your background using Prima Colour Blooms.
 step 7 - Once all the inks are dry, adhere your photo in place. Adhere the ‘locked’ key hole die on the left overlapping your photo. I cut a second lock out of grey cardstock and adhere it in the keyhole. You can also just back the keyhole bit with patterned paper behind the opening to add colour and dimension.
 step 8 - Add a second colour to your background using a second colour of mist as an accent colour. Finish off with additional embellishments.
 PS: to minimize the buckling of my layout after adding all the inks, mists and mediums, I adhered it to a piece of grey chip using my Tombow glue stick making it really smooth and firm.
In a few easy steps I added some gorgeous details using cutting dies on a layout – simply cut out of cardstock – quick and easy.

Using Dies As Accents – Cluster Technique.

hello everyone - my apologies for still being MIA. But i still havea good reason - we are still not done with customizing my workspace. It has taken so much longer than what i hoped for various reasons! But I am seeing light at the end of the disorganized tunnel (and hopefully it's not a train).
So Fridays layout shared on the Wholesaler's blog is a fun one using some of my all time favourite dies from Couture Creations.
I have spoken a lot in the past about using dies on cards and layouts, and even as I use it more I realise the possibilities are endless. As you run out of elements to use and alphabets to create titles with, dies are those things that will never run out – each time you use a different paper or cardstock or technique on a die-cut, you can alter and change the way it looks and functions. 

TIP: when you group elements together on a layout, you form clusters. These make a bigger statement and have a huge impact when grouped closely together, when things are spread out too far from each other they lose their visual appeal and purpose.

Notice how the die cuts form an integrate part of the design without being lost – this is because they have a purpose in grounding the left hand side of the layout visually. The cluster also balances the layout having the enlarged photograph on the right hand side.
 
 I started off by adding my circle doily die cut underneath the vertical paper strips. I then added three leaf dies on top of the doily and finished off the cluster with a butterfly die cut on top of everything. A couple of printed tags cut from patterned paper and other elements finish off the cluster – but keeping everything nice and tidy close together.

Not only did I use the die-cuts to support my layout theme of being outside, the die cuts also lend colour and texture to the layout with its various layers.
And that’s how easy it is to incorporate die cuts into your layouts.

The Quick release paper on top of the die, creates a buffer between the die and your paper, which enables your paper to be released a lot easier as it is the release paper that will be left behind in the die. Trust me it makes a huge difference.
I place my dies skew inside my Cuttlebug – this way the pressure seems to be all over the die. This works especially when you have intricate dies with lots of details.

By colouring smooth white cardstock in different colours, I can create my own custom patterned papers in the exact colours I need for my project – making my die cuts unique and personalized each time I use them.
 Die cutting elements out of plain cardstock is so easy. They offer the opportunity to be inked on the edges, stamped on, embossed in your Cuttlebug, heat embossed, foiled, sanded, glittered or left plain. Each time you add a product to a die cut, you change the look of it, giving you loads of opportunities using them over and over again.

Tips and tricks for using die cuts:

When you cut detailed and intricate die designs on your Cuttlebug, I recommend that you use a metal cutting plate to ensure a nice clean cut

My sandwich in my machine for cutting is as follows: A, metal place, B, die facing up, paper, Quick release paper, C. I cut into my C plate – why? Well this was the original ever sandwich stack and it also prevents my B plate and C plate from curling up so much. I hardly ever replace my C or B plates because of curling and this is the reason why. When you use the stack A, C, B then your plates will curl excessively and will snap and need replacing more often.
**Please note that this is my own personal experience from practice
 

So go on – start using dies as accents, be brave try a cluster technique and start cutting away!


The power of a smile card - Couture Creations.

Hi, Jowilna here with today's' blog post!It's about time for the new Hearts Ease Collection to hit the stores all over the world and we got to play with the new dies. I teamed the dies with the Vintage Rose patterned paper - and it worked so well. Order your favourite dies from your local store to make sure you don't miss out!
For my card I combined two dies from the Hearts Ease collection  -
the Viola CO724311 and Mirabilis CO724314 dies.
Here's how i created my card
step 1 - Use the vintage rose 6x6 paper pad and cut the large Mirabilis die. I included the center part of the die to cut out the window - don't you just love the versatility of using the center or excluding it! So easy to totally change the look of your die cuts!
step 2 - I then repeated the center cut on a second piece of patterned paper to include the quote.
step 3 - prepare the background of your card with a piece of patterned paper from the 6x6 paper pad.
step 4 - ink the edges of the die cuts and adhere them to the background.
step 5 - die cut the Viola out of pink paper.
step 6 - Combine pink and silver glitter embossing powders on the Viola die-cut and heat to melt the powder. The glitter embossing powder adds a subtle shimmer to the pink embossing.
step 7 - punch small flowers from the left over paper. Adhere the flowers to the front of your card along with the other elements using your 2 way glue pen.
For my card i used these products from the Couture Creations Range

My Valentine – make a decorative rosette with punches.

Are you planning something special for this Valentines Day and your loved ones? We try and celebrate love everyday so hardly ever do something special, but on the odd occasion i will do something that my better half really loves – like buy a slab of Lindt Chocolate and wrap it beautifully.
I started off by wrapping the chocolate slab in some pretty decorative paper, and then created a focal point topper using punches and dies.
A punched border runs down from top to bottom on the front, with a decorative rosette on top of the border.
 step 1 – Punch a border strip from patterned paper using your selected Tonic punch
 Step 2 – Keep the remainder of the paper left-over from the punched border, and trim that piece to measure 2.5cm wide.
 step 3 – Place the strip in a trimmer or score board and score the strip at every 5mm all along the length
 step 4 – Mountain and valley fold the entire strip on the score lines
 step 5 – adhere the two ends together after folding the strip. Keep it tight. The decorative scallop border now sits at the bottom and will form the outside of your rosette.
 step 6 – Adhere the rosette to a base circle using a hot glue gun from the Chiswick range.
 step 7 – Die cut some decorative elements from Chiswick cardstock.
 Assemble the rosette together with the die-cuts, punched border and sticker on the front of the decorated slab.
a Quick and easy way of adding a special touch to an ordinary slab of chocolate.
Textured cardstock Scarlet sb5270
Simplicity Strip Punch Daisy pct770
Chiswick Burnishing tool
What special gift will you create for your loved ones?
Remember to visit the website to view all these wonderful products www.chiswick.co.za
Until next time happy crafting!

Soap Box picture frame for Couture Creations.

Well I hope you are having a wonderful festive season and getting some much needed creative time into recharge your batteries so to speak. For this blog post I create a Soap Box picture frame - just a fun little altered thing. Every now and again I find a box that will be perfect for something, and this something was it!
I started off by covering it in patterned paper from the Damask Delight paper pad. I also used the striped paper from the pad to create a band across the top. To decorate the front and sides I used some of the beautiful Christmas dies available for 2014.
The Bon Bon die was turned into a flat "wrapped sweet" to adorn the front of the box.
On top of the sweet I added the word "happy" cut with the Christmas banners die. Love these words!
The little holly flower is from the Bon Bon die and decorated with a small diamante - have you seen the huge range available from Couture Creations? Stunning!
The Bon Bon was cut into parts to use, and this little left over bit formed a nice clasp at the top of the box giving the impression that it can be opened.
The sides of the box was decorated with the diamonds popped out of the die and decorated with diamante in between.
Here's how i used the dies on my project
step 1 - Cut the bon bon out of patterned paper
step 2 - Keep the flower and diamond parts to use them later on
step 3 - Cut apart the die - I used two side sections and then folded it in half on the score lines. Adhere them together to form a nice sturdy sweet.
step 4 - Use the middle section and cut off the ends. Trace it onto another piece of patterned paper from the damask paper pad. Ink the edges.
step 5 - adhere the cut out part to the top of the sweet part and then add your word banner, flower, and ribbon bows around the ends.
And there you have it - how to turn your Christmas themed dies into something that you can use all year long - not just around the festive time! So get creative and start digging out those dies!
Here's wishing you a wonderful Festive season! Until next time - Peace and Love!


Remember to visit the blog for more inspiration and like us on Facebook!

Popular Posts

Like us on Facebook

Flickr Images