Stamped card | Flower details with POP Paint.

Once you get into the groove of living a creative life, it is amazing how easily you find your products
from various crafts, can work for all kinds of applications. Today I am using POP Paint to create some beautiful stamped flowers on a card.
 The orange/red colour of the Flamingo POP paint matched perfectly with the colour of my tag making for a beautifully designed card.
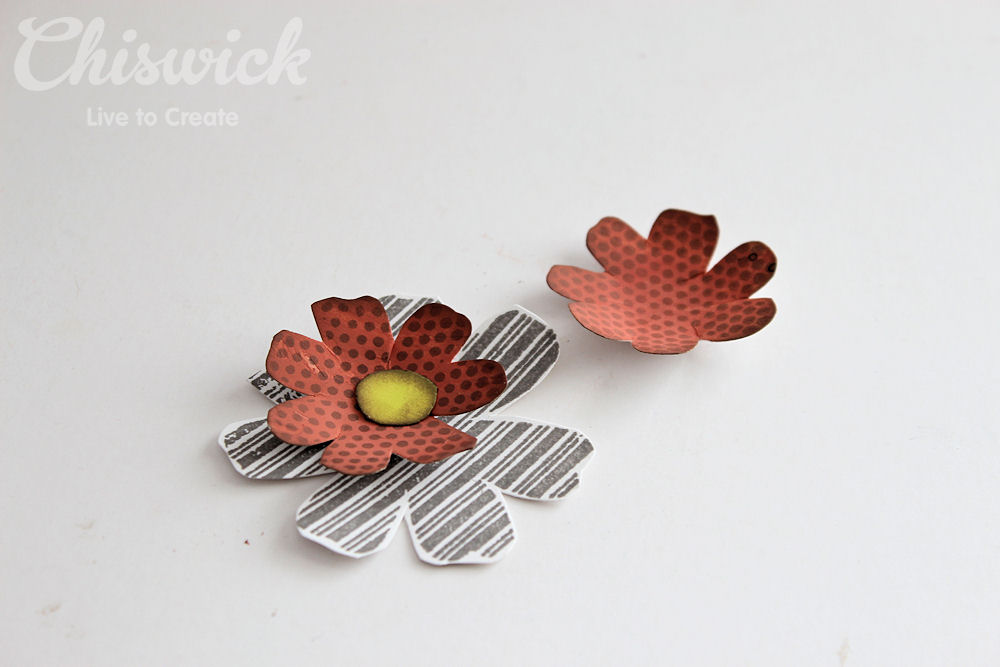
 step 1 Stamp various flowers from the Clear Stamp – Daisies (ER-C10) rs3174
stamp set in grey ink onto white cardstock.
step 2 Colour some scrap pieces of white cardstock by using a paint palette to add a layer of paint to the paper.
 step 3 Once the paint is dry, stamped some more smaller flowers onto the paint using the same grey ink. Let the ink dry for a few minutes.
Cut out the flowers around the edges and shape them slightly.
step 4 Colour another piece of cardstock with Zest paint and leave to dry.
Once dry, cut out small circles for the centres of your flowers. I cut mine freehand but you can also use a circle punch.
step 5 – Gather all your parts together. Some painted flowers and some plain flowers, and then layer them on top of each other. Adhere the flowers together to form a single flower unit.

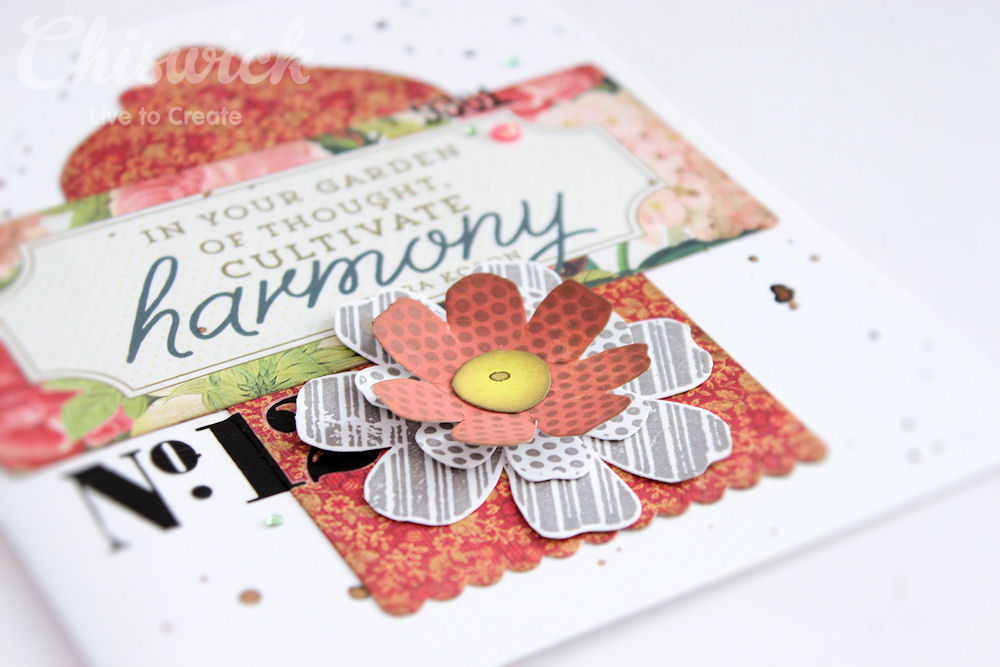
Assemble your card with all your pieces. Add a coloured tag, sentiment card, your layered flower and some rub-ons to the folded card and then finish off with some diamante and other dimensional elements.
 A beautiful simplistic card with a beautiful focal point flower created using furniture paint. Simply gorgeous!
what have you done with your POP Paint today?
Ask for POP Paint at your local craft store.


Father's day Card | How to stamp with masking tape.

Up on the Chiswick blog I am sharing a special card for Dad, and how to stamp with masking tape
making your own paint striped stamps - quick and easy and oh so versatile.
Hop on over to see the full step x step tutorial.
Celebrate dad with a special handmade card to really show your love.
Until next time - hope you are inspired by this quick and easy stamping technique!

Christmas Exploding box - The Wholesaler.

Over on The Wholesaler blog you can read all about my Christmas Exploding box - perfect to impress those crafting skeptics and make a statement. This truly is a magnificent piece that cause everyone to ooh and ahhh. So go on and give it a go...
 Making gift boxes has become a rather important and easy thing to do – so if you are a crafter then you really have no excuse, other than to have a fabulous gift box for treats and small gifts alike.
Years ago when I first made my first exploding gift box I turned it into a mini album rather than a box. I was pretty impressed with it and it had huge impact on everyone that viewed it. But nowadays I am much more of a simpler kind of crafter. So instead of making it complicated like we do, I made the same box using a festive theme.
I will use the box for a small gift or chocolaty treats instead and afterwards the recipient can recycle it and turn it into gift tags by simply cutting it apart, punching a small hole and adding some ribbon. This way no one will be stuck with something that can’t be used, gathering dust and adding clutter to their lives. A gift within a gift I say.

Altered notebook and altered stamps.

I am up on the Chiswick blog with this super cut and functional little altered notebook.
See how I altered one of their stamps into something for the everyday and not theme specific.
Just love the simplicity of how this turned out!
Head on over to see what I did! Thanks for stopping by. We had a lovely thunderstorm last night
and it seems like Spring has officially arrived although it feels like winter again! So happy for the gorgeous rain after an almost devastating fire the previous night. So grateful to God for keeping us all save! We are blessed.

Butterfly wings - new stamp set and art journal page.

Up on the blog today at Chiswick today I am sharing another one of their new stamp sets and loving this one just as much!
So hop on over and catch a glimpse of the new stamp set and step by step article!
Here's wishing you a creative week ahead - and thanks for stopping by!
A blog without visitors is just me talking to myself - so know that you are so very much appreciated!

#lifeisgood - NEW stamped floral card for Chiswick.

I am up on the Chiswick blog today with this stunner of a stamped card using their new stamp sets.
Hop on over to the blog and see how i did it and to view the entire stamp set.
Love the layered look of the stamped flowers...
Remember to visit your local craft store to get your new Chiswick stamps sets today!
Please let us know if you have any trouble getting hold of the products and we will assist you gladly.
Until later – happy stamping! Have a blessed day!
Products used
Clear Stamp – Daisies (ER-C10) rs3174
3 in 1 Block Set with Interchangable Handle rs3070
Craft Guillotine – 6.25″ pct809
Plastic Bone Folder cr1200
9pc Eyelet Tool Set cr1100
Embroidery Scissor 110mm cr0900

Cuppa tea stamped thank you card - Chiswick.

I am over on the Chiswick blog today with a beautiful card using their new Tea and Cake stamp set.
Head on over to see how I added colour to my stamped image and to view the entire set of stamps.
They are so much fun and versatile - perfect for tea party invitations, recipe books, favorite meal time layouts....if you can think it you can create it using this stamp set.
www.chiswick.co.za/blog

Stamped details with lady Pattern Paper.

I have a huge selection of gorgeous stamps that I love so much. So I am on a mission to use all of them at least once this year – quite a commitment and mission but something that is making me feel so much better. But more exciting is the fact that I can create my own embellishments using my stamps. So I stamped a couple of images onto my Lady Pattern Paper and used them on my layout turning my layout into something truly unique.


I used a combination of the Intense Teal and So Buff papers to create a very pleasant layout that is calm – a somewhat neutral background for my photos to sit on and the cluster of stamped elements and embellishments.

 I stamped this beautiful diamond shaped stamp onto the Essentials Gingham pattern. The stamp allows a slight hint of colour and pattern to show through it making for an interesting element.


 I only use VersaFine ink for most of my stamped images. This ink is perfect for the detailed stamps I used, and dries perfectly on the Lady Pattern Paper.
 For my butterfly stamped images I used a combination of Gingham and Sheet Music papers in Teal. The pure black ink against the stunning teal colour is such a wonderful combination. To finish off the stamped butterflies I added some metal elements and diamanté to the centres as a nice finishing touch adding dimension.
 Use large and small butterfly images and stamp them onto your patterned paper to create your own embellishments. Dress them up with other elements and let them float on your layout by only adhering them in the centre of the butterfly and letting the wings float lose.
To add some of my red/pink accent colour I used a scrap of the Pink Mary script paper to the right hand side of my layout, combined it with stamped words and elements for dimension and texture. Grouping elements together to fill an empty space on a layout makes for a wonderful and simple statement.

I love how busy this layout is, but also quite pleasing with loads of interest. And my favourite foundation for creating this stamped detail layout is my Lady Pattern Papers.


New stamp sets from Chiswick – resist embossed card.

Have you seen the new stamp sets from Chiswick? Well if not you are in for a real treat as they as simply wonderful. My favorite I think for now is the heart set. It has a whole bunch of hearts on it – perfect for anything from the grungy teenager to the romantic soul.
For this resist card I used the scribble heart – and simply love the outcome.
Embossing and resist is still one of my favorite go-to techniques when it comes to stamps.
It is such a versatile and effective way of adding patterns and interest to a card.
step 1 – Stamp the heart image onto white cardstock using Versamark ink pad.
step 2 – Sprinkle the stamped image liberally with white pearl embossing powder.
Shake off the excess embossing powder and return it to the container.
step 3 – Use your Chiswick heat gun and heat the image until the embossing powder is fully melted.
The powder is melted when the image turns shiny all over.
TIP: Make sure the entire image is heated and the powder melted – let it cool down before inking the image.
step 4 – Add some dye ink onto your craft sheet. Mist the ink with water and then dip the embossed image into the ink. The ink will take to the cardstock and the embossed image will resist the ink.
Use a soft cloth to wipe any ink that may sit on top of the embossed surface.
 The white images against the inked background is such a beautiful effect.
 Products used:
Dye Ink Pad- Red
rs3291
Clear Stamp – Assorted Hearts (ER-C19) rs3176
3 in 1 Block Set with Interchangable Handle rs3070
Keep an eye out for more of the wonderful stamp sets in the coming blog posts.
Happy stamping!

Butterfly wishes – stamped card with gold foil detail.

One of my favourite things is a simple stamped card with some gold detail. For today’s card I used my all time favourite butterfly stamp image from Chiswick. A simple stamped images coloured and added to a bold blue background using Chiswick cardstock. 

visit the Chiswick blog here to see the full step x step instructions.
Happy stamping everyone!

Sweet Mum – A Card Just for Her.

It's Mothers' day weekend and I hope you have made something handmade for that special person in your life? I made this little birdie specially for her, featuring some of my new favorite IMAGINE Crafts and Tsukineko products. Head on over to the blog for a step x step on how to re-create this quick card.
My mom loves birds and so for this Mother’s day I wanted to make a card that incorporates a little birdie. Thankfully I have some really cute stamps and with the help of the amazing StazOn Studio Glaze I could add some really amazing color to my image. For my sentiment I used two stamps and stamped them in different colors for a fun look.  Learn how to make your ‘Sweet Mum’ this lovely sentiment here!

Double Page layout - Create magazine and Heidi Swapp.

Today I am sharing my double page layout based on the sketch from Create Magazine. I simply love Allison's sketches - she really is amazing. I love using sketches as a starting point, although more than often my layout turns out to be something a lot different. I use them to inspire me, to help me start a project and then I turn it into something very true to my style. And this assignment was no different.
I chopped and changed and moved things around.
For my accents and embellishments I used Multicoloured stamping with MementoLuxe ink pads, Christmas themed chipboards, stickers, washi tape, buttons, sewing and stenciling.
To get the sketches from the January issue, you can download them for free here

Thank you to Minette for letting me use her beautiful photos, and a special shout out to Annemarie for taking such amazing photos.
Here's wishing you a wonderful and creative day! Blessings!

Hello Today – double page layout with Heidi Swapp

I think the reason I love Heidi Swapp products so much is because of her elegant and versatile style. There’s something for everyone and even if the collection scream ‘girl’ there is plenty in there to make boy projects too – it really is that versatile and adaptable. So when I got my hand on the new products that will be available from The Wholesaler I was in heaven! The new paper pads are so amazing, colourful and simply gorgeous. The combination of teal, navy, brown and pink is stunning and with those combinations you can really do just about anything you set your mind to.
So I had some special photos taken recently and since the papers was calling me to use them I had to make a double page layout. I combined some pretty pastel shade papers with bold navy, gold embossing and stickers and subtly background stamping – everything about this layout I really love, and I think it has everything to do with the gorgeous products from HS.


I used one of the large background stamps and embossed it in gold onto white cardstock. Once the embossing cooled down I used some inks to add colour to the background to match the patterned paper. Embossing still is one of my favourite techniques and always looks stunning!
In the background I used some of her wording stamps and repeatedly stamped the word ‘grateful’ in a light grey ink pad. I stamped it so that it would overlap each other in a random fashion inking once and stamping twice to give me darker and lighter images. A fun and totally random effect.
I love her new range of glitter stickers in her handwriting. They really are super versatile and easy to use. Any layout without writing in some form or manner will be incomplete, and these are just beautiful!
I can’t wait to get my hands on the next set of new products from Heidi Swapp – functional, beautiful and inspirational!
Two tone stamping with Mister Huey inks
step 1 - Mist classic tan Mister Huey onto your craft sheet, on top of
the tan mist Gold Mister Huey ink
Step 2 - cut a circle from fun foam and adhere it to an acrylic block with some double sided tape. Press the custom made stamp into the ink and move it around a bit to mix the inks
step 3 - carefully lift the stamp and press it onto your cardstock where you want your image. Hold your paper and lift the stamp
TIP: Keep in mind, if your stamp is too wet with the liquid ink, when you lift if the ink will simply drip off of the stamp and even land where you don't want it to land on your project.
because Mister Huey inks are not too runny you shouldn't have a problem but should you mist the ink with water you may want to be aware that this could happen

Products used
Heidi Swapp  Stickers HS01108
Heidi Swapp Stamp HS01140
Heidi Swapp Paper Pad Hello Today HS01155
ZING! Metallic Embossing Powder 1 oz – Gold AC 27158
VersaMark Watermark Ink Pad TVM-001

until next time - have a wonderfully creative week!

Popular Posts

Like us on Facebook

Flickr Images